Stage Wise Quality Inspection Checklist for Kerala Homes
 Renovation
Most homeowners inspect their house once, on the day they are handed the keys. A construction quality inspection checklist Kerala homeowners can actually use works the other way round: it fixes a short list of checks at each stage, before the next stage covers the work up. By handover the reinforcement is buried, the pipes are behind plaster and the waterproofing is under tile.
The principle is simple. Some things must be tested with an instrument or a record, and some can be judged by eye in two minutes. Knowing which is which, and who signs off each stage, is what separates a house that ages well from one that starts leaking in its third monsoon.
Key Takeaways
- Inspect at hold points, before the next stage hides the work. Afterwards is too late and far more expensive.
- Test what you cannot see: concrete slump and cubes, plumbing pressure, slab ponding. Eyeball what you can: lines, levels, joints and finish.
- Reinforcement cover and curing decide the life of the structure more than the grade of cement on the invoice.
- Every stage needs a named person who signs off, and a written record kept with the project file.
- A handover snag list is a closing step, not a substitute for the inspections that should have come before it.
Why a Stage Wise Inspection Plan Matters
A house is built in layers, and each layer conceals the one beneath it. Once a layer is closed, checking it means breaking something, so the only economical moment to inspect is just before it is covered.
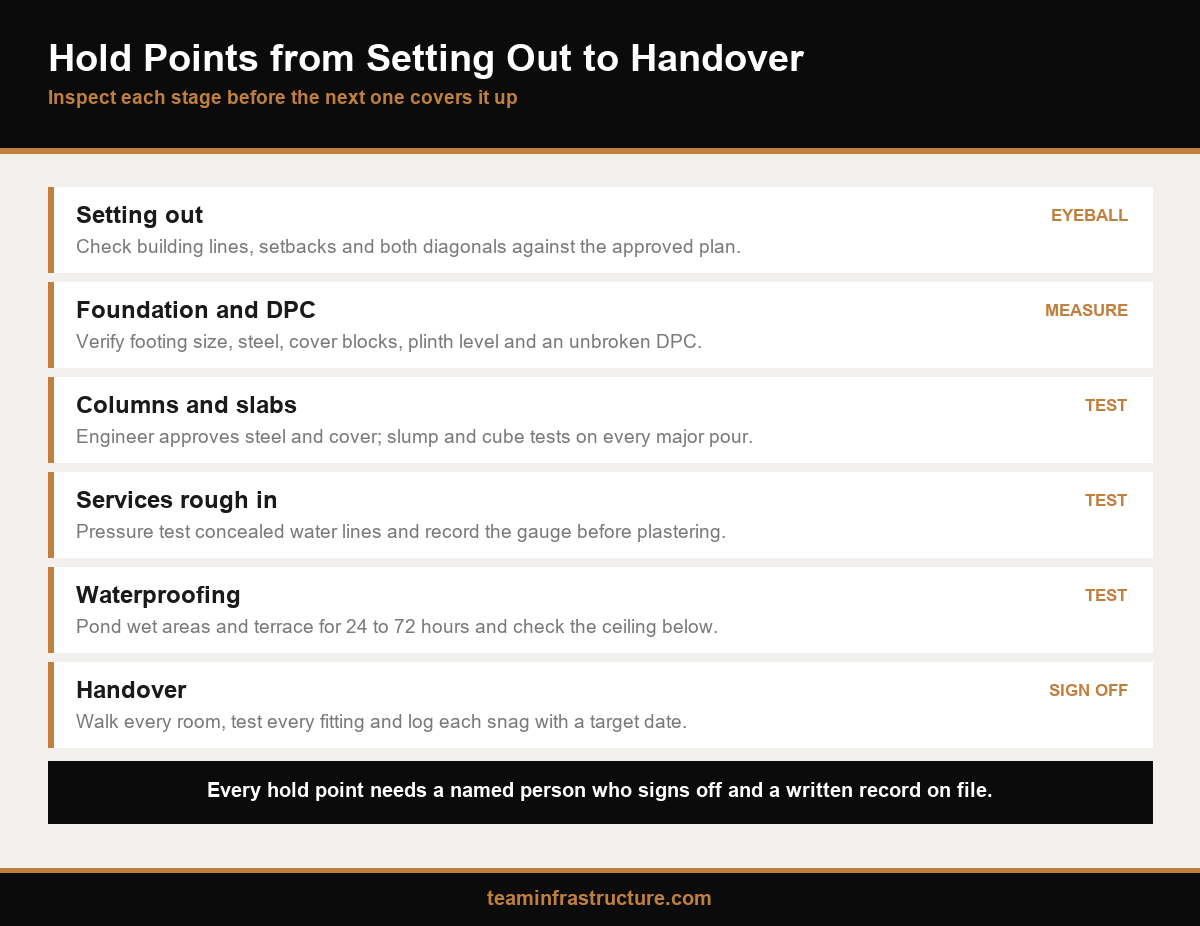
That is why a good programme of quality checks construction teams follow is built around hold points. A hold point is a pause written into the schedule where work cannot proceed until a named person has inspected and approved it. On a typical Kerala home there are around ten of them, from setting out to handover. Skipping one rarely saves more than a day.
The second principle is to separate testing from looking. Concrete strength, pipe tightness and slab watertightness need a test and a recorded result. Line, level, plumb, joint width and finish can be judged by a trained eye with a spirit level and a straight edge. Both matter, but only the tests produce evidence you can file.
The third principle is sign off. Experienced civil construction contractors assign responsibility clearly: the site engineer checks every hold point, the structural engineer approves reinforcement before major pours, and the owner or the owner's representative sees the critical stages in person. At TeamInfra we carry out a quality check at every stage and follow Bureau of Indian Standards practice, with structural review from our associated structural consultancy where the design calls for it.
The standards behind all of this are public. The Bureau of Indian Standards publishes the codes that govern concrete, steel and masonry, and the National Building Code of India draws them together for buildings. You need a builder whose checklist is visibly based on them, which is what BIS aligned construction practices mean on site.
Setting Out, Excavation and Foundation
Setting out is the first hold point and the one most often rushed. Check the building lines against the approved plan and the plot boundary, measure both diagonals of every rectangle, and confirm the setbacks before a single trench is dug. Diagonals that differ by more than about 10 mm on a house footprint mean the layout is out of square.
Excavation is mostly an eyeball stage. Confirm trench depth and width against the drawings, look for soft pockets, roots or water at the base, and check the bottom is level and compacted. Where the soil differs from what the soil testing and foundation report assumed, stop and ask the engineer. Kerala's laterite, clay and filled paddy land behave very differently.
For the foundation itself, the checks shift towards measurement. Footing size, reinforcement spacing and cover blocks should be verified against the structural drawing before concrete is placed. Cover to the footing steel is typically around 50 mm, and it should come from proper cover blocks, not from stones or broken brick pushed under the mesh.
The plinth beam and damp proof course close this stage. Check the plinth level with a water level or an instrument at every corner, confirm the beam reinforcement before the pour, and inspect the DPC for continuity at junctions and corners. A thin, broken DPC is one of the most common causes of rising damp in ground floor walls. Ask for the DPC to be inspected before the first course of masonry is laid over it.
Columns and Slabs: Reinforcement, Shuttering and Concrete
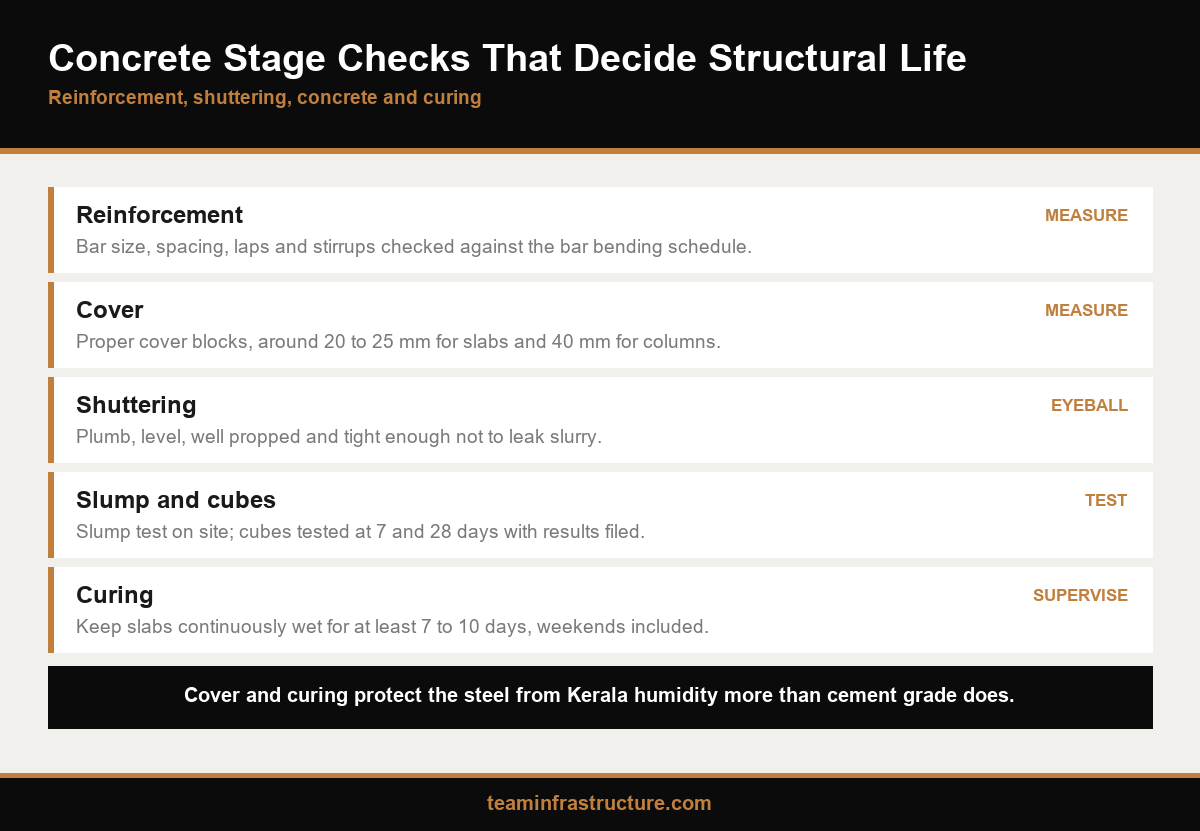
This is the stage that decides the structural life of the house, and it deserves the most attention. Before any pour, the structural engineer or site engineer should inspect the reinforcement against the bar bending schedule: bar diameter, number, spacing, lap length, and the position of stirrups near column and beam junctions. Photograph it before concrete goes in.
Cover is the single check most likely to be wrong. Indicative nominal cover is around 20 to 25 mm for slabs, 25 to 30 mm for beams and 40 mm for columns, as fixed by the structural engineer. Too little cover and Kerala's humidity reaches the steel within a decade. Check that cover blocks are in place and correctly sized.
Shuttering is mostly visual. Look for plumb columns, a level and well propped slab soffit, tight joints that will not leak slurry, and props sitting on firm ground rather than loose soil. Check that conduits and sleeves for plumbing are placed in the slab before the pour, not cut in afterwards.
Concrete needs testing. A concrete slump test on site shows whether water has been added to make placing easier, which weakens the mix. Cube samples should be cast from each major pour and tested at 7 and 28 days, with results filed. Insist on mechanical vibration, and watch for honeycombing once the shuttering is struck.
Curing is where good concrete is lost. Slabs need to be kept continuously wet, usually by ponding or wet hessian, for at least 7 days with ordinary cement and 10 days or more with blended cement. A dry slab on a Sunday afternoon is a quality failure.
Masonry, Services Rough In and Plastering
Masonry checks are largely visual but should be done wall by wall. Look for consistent joint thickness, staggered vertical joints, walls true to plumb and proper bonding at corners and columns. Lintels and sill bands should be cast at the right level and fully cured before loading.
Electrical and plumbing rough in is a hold point that homeowners often miss. Check conduit routes against the electrical layout, confirm box positions and heights, and make sure no structural member has been cut to run a pipe. Every concealed water line should be pressure tested before it is plastered over, typically at around one and a half times working pressure and held long enough to show any drop on the gauge. Record the reading and the duration.
Drainage lines need their own check. Confirm the slope by running water through them, and inspect joints at bends and traps.
Plastering closes the rough work. Check surfaces with a straight edge around 2 m long, look for hollow patches by tapping, and confirm that chicken mesh has been fixed across joints between masonry and concrete, where cracks most often appear. Corners should be true and plaster should be cured, not left to dry out in the afternoon sun.
Waterproofing, Tiling and the Handover Snag List
Waterproofing is tested, never assumed. Wet areas and the terrace slab should be ponded with water, typically to around 50 mm, for 24 to 72 hours before tiles or screed go down. Inspect the ceiling below for damp patches. Pay particular attention to upturns at walls, pipe penetrations and floor drains, which are where waterproofing usually fails in a Kerala monsoon.
Tiling and finishes are mostly an eyeball stage, but a careful one. Tap tiles to find hollow spots, check slopes towards drains with a level, confirm even joint widths and grouting, and look along walls for lippage between tiles. Check doors and windows for smooth operation and secure fixings.
The handover snag list is the final hold point. Walk every room with the site engineer, test every switch, tap, flush and socket, open and close every shutter, and note each defect in writing with a target date for correction. Ask for the stage records as part of handover: cube results, pressure test readings, ponding records and as built drawings for concealed services.
Insist on these records in the contract from day one. Our guide to the documents to demand before signing a build contract sets out the paperwork that makes inspection enforceable, and the comparison of civil contractors in Kochi explains how to judge whether a firm actually works this way.
Conclusion
Good home construction quality is not one inspection at the end. It is a sequence of hold points, each checked before the next stage covers it, with tests for what cannot be seen and a trained eye for what can. Reinforcement cover, curing, pressure tests and ponding tests deserve the most care, because their failures stay hidden longest.
Ask your builder for the checklist before work starts, agree who signs off each stage, and keep the records with your title documents. To walk through a stage wise inspection plan for your own home, talk to our team in Tripunithura.
Tolerances, test durations and figures are indicative for Kochi and Ernakulam district as of October 2026 and do not replace your structural engineer's specification.
Frequently Asked Questions
What should a construction quality inspection checklist Kerala homeowners use include?

Which construction stages need a test rather than a visual check?
Who should sign off each stage of a home build?
How long should a concrete slab be cured in Kerala?
How is a bathroom or terrace ponding test done?
What records should I receive at handover?