Remote Site Monitoring Checklist for NRIs Building in Kerala
 Renovation
Remote home construction monitoring Kerala NRIs can trust is not about watching every brick from Dubai or Doha. It is about knowing exactly what evidence to expect at each stage, and holding back each payment until that evidence arrives. Most families building from abroad lose control in the same way. Updates start strong, thin out by the plinth, and shrink to a forwarded photo of a wall by the time the slab is cast.
This checklist sets out what you should receive at every stage, from site setup to handover. It also covers the weekly communication rhythm that keeps a remote build on track, and the red flags that tell you it is drifting.
Key Takeaways
- Agree the evidence for every stage in writing before work starts, and tie each payment to it.
- Photos alone are not proof. Ask for measurements, test results and a tape in the frame.
- Foundation, slab reinforcement and waterproofing cannot be checked later, so never accept a late report on them.
- Run a fixed weekly rhythm: daily WhatsApp photos, a weekly video walk through and a written stage report.
- Silence, vague photos and requests for advance money are the earliest signs a remote project is drifting.
Agree the Evidence Before You Agree the Price
Most NRI owners negotiate the rate per square foot for weeks and spend ten minutes on reporting. That is the wrong way round. The rate decides what you pay. The reporting standard decides whether you ever find out what you got for it.
Before signing, write down what you will receive at each stage, in what format and within how many days. A good stage report has four parts: dated photographs from fixed points, a short video, the key measurements against the drawing, and a list of approvals or tests completed. Put that site update checklist into the contract annexure alongside the payment schedule, so each instalment is released against evidence rather than a phone call. Our guide to contract types and payment schedules explains how to link the two, and our list of documents worth demanding before you sign covers the rest of the paperwork.
Fixed photo points matter more than people expect. Ask the site engineer to mark four or five spots on the plot, one at each corner and one at the gate, and to shoot from those spots every week. Over six months you get a time lapse of the whole build, and any gap or change is obvious at a glance.
Decide also who reports to you. A supervisor sending photos is useful. An engineer signing off a stage report is accountable. When you shortlist a Kerala construction company for NRIs, ask how it handles stage checks and project updates before you commit. At TeamInfra, quality checks at every stage and timely project updates are part of our construction service. For wider support while you live abroad, Norka Roots is the Kerala government agency for non resident Keralites.
Site Setup, Foundation and Plinth
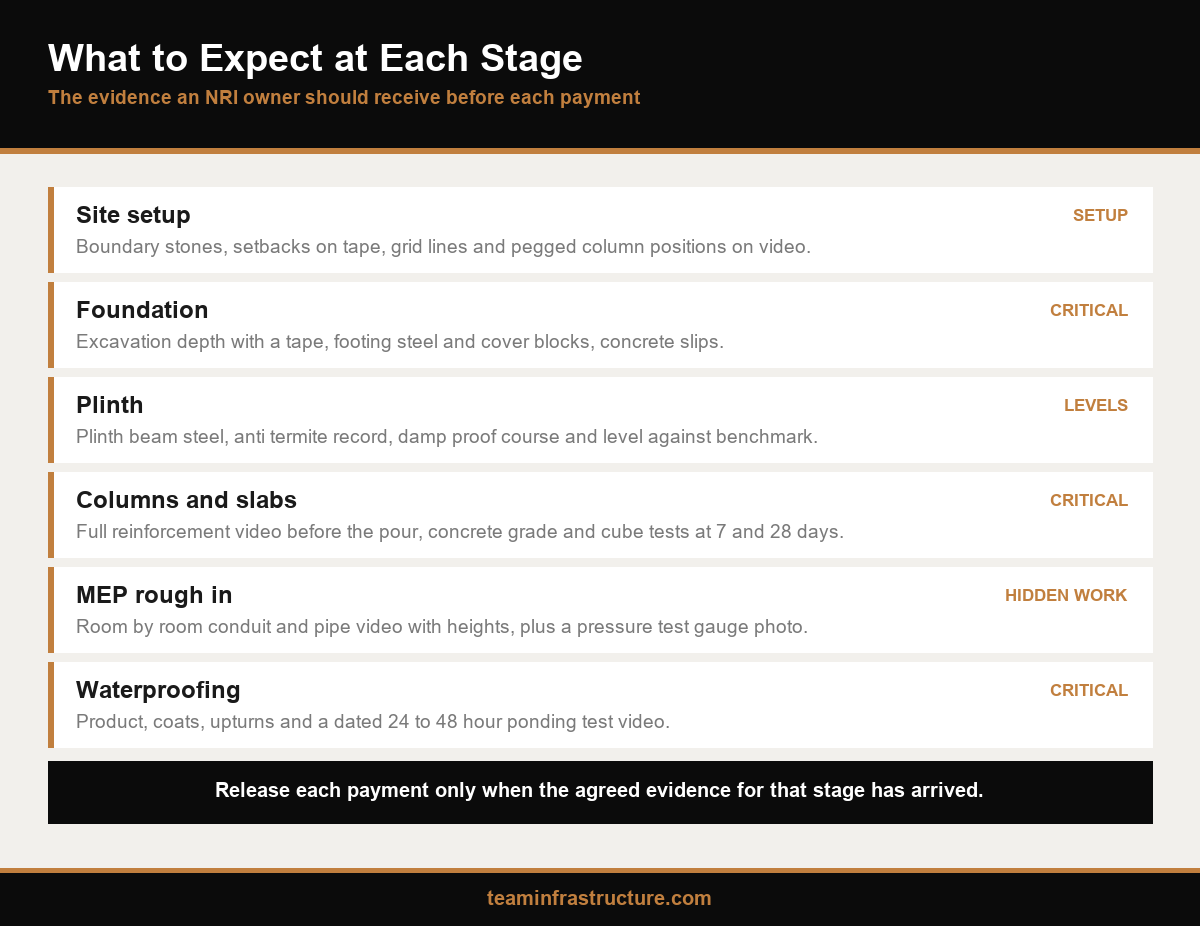
Site setup is the stage most owners leave off their checklist, and it is where the first serious errors happen. Ask for photos of the boundary survey stones, the setback from each boundary measured with a tape, the material store, and the water source. Request a short video of the setting out, with grid lines visible and column positions pegged.
The foundation is the first stage you cannot inspect later. Ask for the soil investigation report if one was done, photos of excavation depth with a tape standing in the pit, the PCC bed, footing reinforcement before concreting with cover blocks visible, and the concrete delivery slips or mix records. If the design calls for piles, ask for a log for each pile. Our explainer on soil testing and foundation types covers what each report should contain.
At plinth level the key evidence is the plinth beam reinforcement, anti termite treatment with the product and date recorded, the damp proof course, and the finished plinth level measured against a fixed benchmark. Plinth height is a monsoon issue, not a cosmetic one. For plots in low lying parts of Ernakulam, check it against the flood guidance published by the Kerala State Disaster Management Authority.
Indicatively, setup to completed plinth takes six to ten weeks on a typical Kochi house, longer if piling is involved or rain interrupts excavation. Expect at least two full stage reports in that window, not just a stream of photos.
Columns, Slabs and Masonry
Columns and slabs are where structural quality is decided, and the evidence window is very short. Once concrete is poured, the reinforcement is hidden for the life of the building. Insist that the slab reinforcement report reaches you before the pour, not after it.
For each column lift, ask for photos of the reinforcement cage with bar count and spacing visible, cover blocks in place, and the shuttering plumb check. For each slab, ask for a full video walk across the reinforcement, close ups of beam and column junctions, the conduits embedded in the slab, and the engineer's sign off. On pour day, request the concrete grade, the cube samples taken, and later the cube test results at 7 and 28 days. The Bureau of Indian Standards publishes the codes your structural engineer should be working to.
Striking and curing need their own evidence. Ask for the dates props were removed and photos of the curing method, whether ponding or wet hessian, for at least the first week after each pour. A slab struck early or left dry in April heat will not show the problem for years.
Masonry is easier to check remotely but easy to rush. Ask for photos of block or brick quality on delivery, the first course on the plinth, lintel reinforcement and lintel level, and door and window openings measured against the drawing. A wall built 100 mm out at this stage becomes a joinery problem months later. Indicatively, the frame and masonry together run three to five months for a two storey home.
MEP Rough In, Plastering, Waterproofing and Finishes
The MEP rough in, meaning the electrical, plumbing and drainage lines that end up inside walls and floors, is the second stage you cannot easily inspect later. Before any wall is plastered, ask for a room by room video of conduits, switch box positions and pipe runs, with a tape showing heights. Ask for a pressure test record on the water lines and a photo of the gauge. Keep this video permanently. It is the only map of what sits inside your walls.
Plastering evidence is simpler: surface photos in raking light, a straight edge check on a few walls, and confirmation that curing was done. Hairline cracks at this point are common and usually harmless, but ask the engineer to log them so you can see whether they grow.
Waterproofing is the third stage that disappears from view. For bathrooms, balconies, the terrace and any sunken slab, ask for the product used, the number of coats, photos of each coat, the upturns at the walls, and a ponding test of 24 to 48 hours with a dated video at start and end. In a Kerala monsoon, a skipped ponding test is the most expensive shortcut in the whole build. Our guide to hidden costs in house construction shows how small leaks become large repair bills.
Finishes are where scope creeps. Ask for photos of tiles, sanitaryware and fittings on delivery with the brand and model visible, so you can confirm they match the approved schedule before they are fixed. Ask for a video of the first tiled room before the rest is laid.
A Weekly Rhythm and the Red Flags
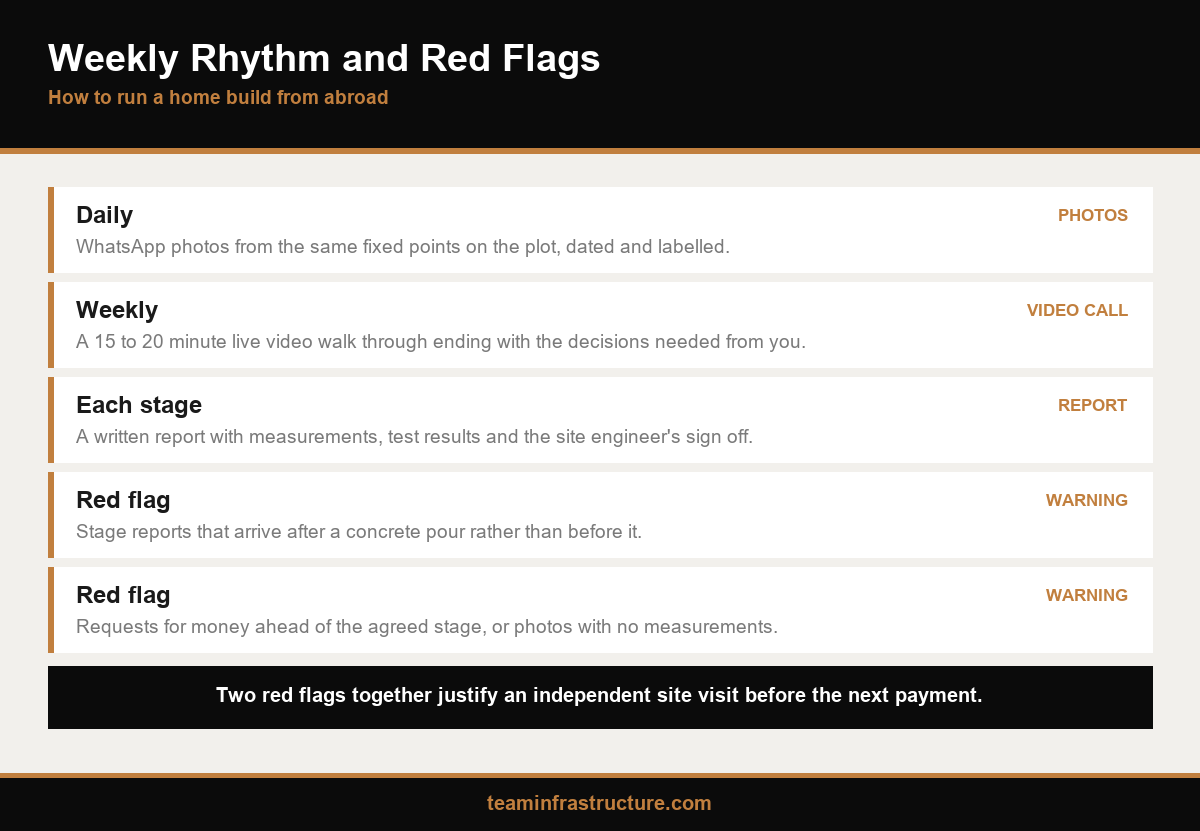
Remote builds go well when communication is boring and predictable. A practical rhythm is daily WhatsApp photos from the fixed points, a 15 to 20 minute live video walk through once a week at a time that suits your time zone, and a written report at every stage milestone. Ask for one shared folder where every report, test result and drawing revision is filed by date.
Use the weekly call for decisions, not discovery. Ask three questions every time: what was completed, what is planned for the next seven days, and what decision is needed from you. Write the answers down and send them back as a short message, so there is a record.
Handover needs its own checklist: a snag walk on video, as built drawings for electrical and plumbing, warranties and manuals, keys and meter readings, and copies of every approval and certificate. If you cannot attend, a trusted relative or an independent engineer can walk the snag list with the builder.
The red flags are consistent. Photos stop arriving or always show the same wall. Reports arrive after a pour rather than before it. You are asked for money ahead of the agreed stage. Measurements never appear in the frame. Calls are repeatedly rescheduled. Any two of these together justify an independent site visit before the next payment.
Conclusion
Home construction from abroad is entirely workable when the evidence is agreed in advance. Fix the reporting standard in the contract, tie payments to it, and protect the three moments that cannot be checked later: the foundation, the slab reinforcement and the waterproofing.
Keep the weekly rhythm simple and keep every record in one place. To see how a stage report and site update plan would work for your plot, talk to our team in Tripunithura.
Stage durations and checklists are indicative for Kochi and Ernakulam district as of October 2026 and do not constitute a quotation.
Frequently Asked Questions
How does remote home construction monitoring Kerala NRIs rely on actually work?

Which construction stages are most important to monitor from abroad?
How often should my builder send site updates?
Are photos enough to confirm construction quality?
What are the warning signs that a remote build is going wrong?
What should I receive at handover if I cannot attend?